
Hot water bottle that is! What did you think I meant?
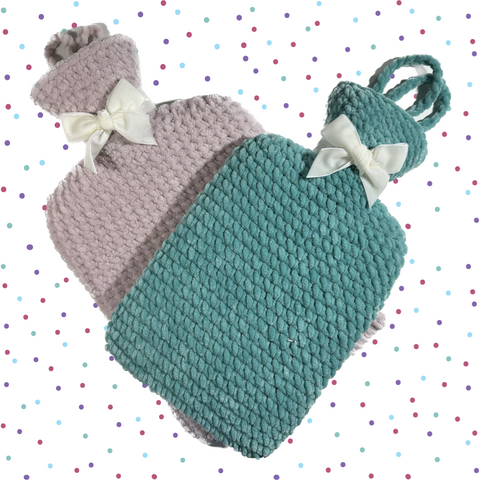
This little beauty had such a warm, reception when we posted pics on the socials we though we had better share the pattern before our inbox exploded with requests!
Everyone loves a hot water bottle to warm their bed on those chilly winter nights and now you can knock up your very own snuggly, cosy cover in no time with this super simple, made to measure pattern.
This pattern will work with any yarn, the chunkier the better but we used a chenille yarn to make it super plush and cuddleable!
You will need
- 100g ball chunky chenille. We used Baby Bunny. Click here to buy!
- 6mm hook or bigger
- 50cm Velvet ribbon
- Hot water bottle
You can even head over to our YouTube channel to find a full video tutorial of every step of the make. Click here to go straight to the vid.
|
Step |
Instructions |
|
1 |
Make a chain the width of the hot water bottle. It should be the same width when just laid on top, don’t stretch the chain to make it fit. Add 2 more chains. |
|
2a |
Starting in the 2nd chain from the hook, work a double into each chain to the end of the chain. Turn the work upside down and work along the other side of the chain working a double crochet into each stitch until you reach the end. DO NOT TURN OR CHAIN. |
|
3 |
Starting in the 1st double crochet you made, work even rounds, just going around and around making a double crochet in each stitch. Watch out for the edges as it is easy to add stitches but you don’t need to. Try it on after a few rounds to make sure it fits! You want it to be snug. |
|
4 |
Continue to work around and around until your work reaches the shoulders of the bottle (where it starts to curve inwards towards the neck). Try it on and make sure that the top of your last row of crochet is just at the point where the edges start to curve in. |
|
5 |
It is easier if you now work with the hot water bottle in as you crochet around it. You can use stitch markers for this next bit or do it by eye. Identify the stitch at each side that sits right on the top edge of the shoulders. Place your stitch marker in if you are using one. We will call this the edge stitch. Crochet along until you have 2 stitches remaining BEFORE the 1st edge stitch. *Decrease 3 doubles together working through the FRONT LOOP ONLY. This is now your new edge stitch. Decrease the next 3 doubles together working through the FRONT LOOP ONLY. Work double crochets until you have 2 stitches remaining before the next edge stitch. Repeat from * until you reach the bottom of the neck of the bottle. If your work is decreasing too quickly, adjust the number of stitches you decrease at each edge to make it hug the shoulders of the hottie. |
|
6 |
Work even rounds of doubles around the neck until the spout starts to flute out. |
|
7 |
Now you need to increase for the fluted opening. Work rounds of doubles, adding an extra stitch to increase as you need it. We started by increasing by 4 stitches per round and adapted it as we went along. Continue until the work just covers the top of the spout finishing in the middle of the front or back. |
|
8 |
Make a chain around 30cm long then join with a slip stitch to the next stitch in the top of the opening. Work a loose slip stitch border all around and fasten off with an invisible join. |
|
9 |
Attach the stopper to the chain using a small crochet hook to pull it through the hole and then looping it around the stopper. |
|
10 |
Sew in all ends, add your bow and you’re all done! |